Front stripping deck
Tags:
Replies to This Discussion
-
Permalink Reply by Rick Newman on February 26, 2012 at 8:06pm
-
I laminated 4 or 6 oz S_Glass to the underside but haven't tested it strength wise yet. I was trying to reduce the possibility of someone leaning on it and it becoming damaged. I am no featherweight so I wouldn't feel comfortable standing up there or trust the connections to the side. In mountain-bike parlance I would be considered a "Clydesdale". You can work with thin structures like 1/4" which my Tatman deck is by fiberglassing a support member like a tube or perhaps a 1" by 1" cross section piece of wood to the underside. The more of these you install and the better you pick their locations the greater the strength. It can even be foam as what provides the strength is the finished u-shaped or rounded shape beneath the loaded structure. Not a lot different than the strength added to corrugated cardboard by the corrugations which are obviously just built of thickened paper. However it is where they are located and what size each corrugation or support member is.
Don Hanson mentioned this type of construction several months ago and related it to it's use in sailboat and yachts. Search for Don's name on here and check out his posts.
Good luck, keep us informed on how it works out.
Rick Newman
-
Permalink Reply by Jack Rose on February 26, 2012 at 8:29pm
-
Steve, I'm renovating my '96 vintage Tatman boat, right now. At the time, Greg offered a front compartment kit that included a 1/4" vertical panel with a cabinet door in it just below the knee braces.
To make the compartment splash-proof, it had a 1/4" plywood stripping deck that was fitted to and sealed around the hull edges.
The stripping deck had a 1"x2" oak brace that was turned on edge and went from an oak ledger block screwed into the stem to another one that was screwed to the back midpoint of the cross piece holding the knee braces. That supported the middle of the deck.
Supporting the outside edges were two cleats, one on each side, that were about 1/2" x 1/2" by whatever length was needed. They had saw kerfs cut into them every 1/2" or so, so that they could be bent to the curvature of the hull. And they were attached with stainless screws and finish washers from outside, through the hull, into the cleat.
I can't remember, for sure, how much of that actually came with the kit and how much came from conversations with Greg. I do remember not being satisfied with my cuts in fitting the deck to the hull. So I sealed it with regular Home Depot type silicone caulk (which held up quite well), and ran a piece of 3/8" oak quarter-round along the hull/deck seam to hide my sloppy carpentry.
However, I always wished that the whole set up was a bit beefier for my 200lbs. Since I had built the boat, I knew where the center brace was, and so, knew where to step, but I was always worried that my passengers wouldn't, and would come down a bit hard and go through that 1/4" plywood.
With that in mind, plus the 30 lbs that I've gained since then, I'll probably beef up the three braces and cut a new deck from a plywood scrap that was left over from the 1/2" bottom that I just put on.
Looking at your boat, though (nice job, by the way), if you're not worried about sealing the deck, why not just go with the 1"x2" center brace as described, above? It looks like it would be pretty easy to retrofit. You could also add a brace like I described above, below the wood side rails if needed (use 5200 if you don't want to go through the hull). And if you're really concerned, you could add an additional 1/4" layer of plywood. Do it from the bottom and you won't have to mess up your finish.
I'm sure there are other ways, but that's the way Greg recommended it back in 1996. If this isn't clear, I'll try to re-explain it. Good luck.
Jack
-
Permalink Reply by Steve Jay on February 26, 2012 at 9:56pm
-
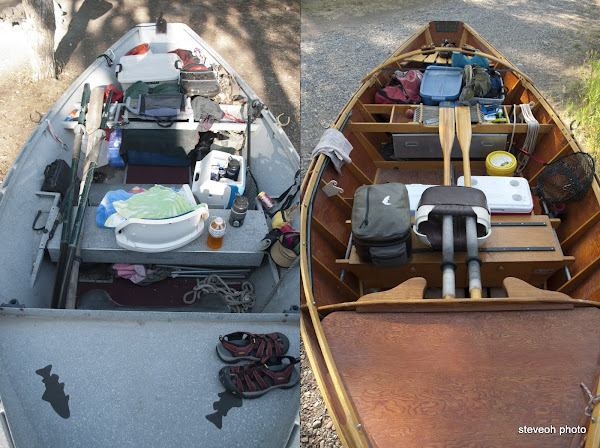
I updated the photo to be of my boat :) sorry for the misleading photo.
Ok so, I could glass the deck to make it stronger. I could also put in a 1x2 on end going from the bow stem to the knee brace. I could use 5200 for those bonds? Then I should remove the wimpy "cleats" that hold on the deck currently and kerf cut some bigger wood and epoxy that on as well. I could probably fashion some sort of fastener so that it would still be removable. I should have some leftover 10oz plain weave from glassing the bottom I could probably use to refinish the current deck. maybe slap some more ply on beneath to make it a bit more solid.
Thanks for the advice... I'll see how it goes.
-
Permalink Reply by Jack Rose on February 28, 2012 at 9:03pm
-
Steve, that sounds like a plan.
One quick modification to what I wrote above. I measured them, yesterday, and those side cleats are only 3/4" x 3/4" with 1/4" kerf cuts every 2 1/2". That sounds kind of light, but they're actually pretty stout, so I don't think I'll modify them.
I do plan to beef up the center support, though, and step up to 1/2" plywood for the deck.
Jack
-
Permalink Reply by Steve Jay on April 20, 2012 at 4:16pm
-
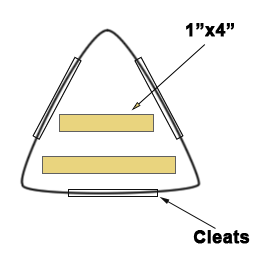
just threw down some 10oz weave on the bottom of the deck board. I'll probably epoxy 2 strips of 1x4's flat to the bottom and glass those as well. I think that should make the deck strong enough to stand on, just hope the cleats hold up.
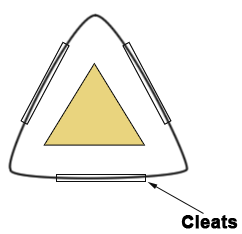
On the other hand, I also have a small triangular piece of 1/2" ply that i was thinking of using. which would look like this
-
Permalink Reply by Dave Z on April 20, 2012 at 5:42pm
-
ooof... I wouldn't put my approaching 190 pound butt up on 1/8" plywood supported only by cleats. I would mount a 1x4 from the stem to the casting brace underneath witht he 1" face supporting the underside of the deck. At minimum!
-
Permalink Reply by Jack Rose on April 20, 2012 at 7:10pm
-
Steve, I'm not as familiar with the strengthening properties of fiberglass, particularly in that orientation as I am with wood.
But what Dave described is pretty much the way my Tatman boat was designed in 1996 as mentioned in my post above. Except that it was a 1x 2, not a 1x4. But as I said, I was always concerned that I hit the middle of that deck and step quickly and lightly.
In my redesign, I've beefed up the 1x2 to a 1x 2 1/2, and the 1/4" plywood deck to 1/2" plywood. I'm also considering backing up those cleats with a piece of 1/4" x 1" oak on the outside if I can figure out a way to make it look good, too.
Even at an additional 30lbs, I think I'll be hard pressed to crack a 30" 1x 2 1/2 turned on edge as long as it's supported properly on either end.
Jack
© 2026 Created by Randy Dersham.
Powered by
![]()


