Wooden Boat People
By McKenzieDriftBoat.com
Guy's Wooden Drift Boat Project
Hello Everyone,
My name is Guy and this is my first post in this forum. I am here because I want to build a wooden drift boat and, undoubtedly, I will occasionally need advice of the pool of experts and experienced drift boat builders on this forum.
In preparation for this project I have read and studied three books: Drift Boats and River Dories by R. L. Fletcher, Boatbuilding with Plywood by G. L. Witt, and Covering Wooden Boats with Fiberglass by A. H. Vaitses. I have also developed my own set of construction plans based off of the "Original McKenzie Double-Ender with Transom" in Fletcher's book. I used and MS Excel spreadsheet to calculate all of the dimensions, cut angles, compound angles, and bevel angles of all frame components and I used Pilot3D software to calculate the as-cut dimensions of the plywood sides and bottom. At this point I am pretty comfortable with the mechanics of construction and I think that I am just about ready to start purchasing lumber.
Presently, I plan to use Meranti Hydro-Tek plywood; 1/4-in. on the sides and 1/2-in. on the bottom. I found plenty of places to purchase these materials, but they are all far away from Idaho Falls, Idaho, and as a result shipping costs more than the materials. Are any of you aware of a business within a few hundred miles of Idaho Falls that sells this plywood? I have a few requests in to the local lumber companies, but I have yet to talk with someone who has heard of this material before.
I also plan to use Port Orford Cedar (CVG) for the straight frame sections and White Oak (quater sawn) for the bent frame sections (chine logs and sheer rails).
Thank you, Guy
Views: 109561
Replies to This Discussion
-
Permalink Reply by Guy Fredrickson on
-
Thanks Greg.
-
-
I just applied the wet-out coat to the second side panel.
-
-
This picture shows the second side panel with the wet-out coat and four addtional coats with the foam roller. Tomorrow (after two days of drying) it will be ready for sanding with 80-grit.
Today I cut a bevel and radius on the chine caps. I'll give them a few coats of epoxy before mounting, but eventually these will be painted along with the outside of the hull.
-
-
The epoxy dried faster than I expected, so I was able to get more accomplished this weekend than I expected. The second side panel is ready for painting. This picture shows both side panels sanded with 220-grit.
I also started laying out the 22-oz. tri-axial fiberglass for the bottom. I have strips to cover the two bare sections. A new order of epoxy should arrive tomorrow.
I may not be able to start epoxying the bottom until next weekend, because once I start it is going to be a long day.
-
Permalink Reply by tungsten on
-
I've been playing with some thick glass myself,one thing i noticed was since theres so much more resin in it.It tends to kick faster so you may want to doit when its cooler out.
-
-
Good point. I can start the wet-out coat first thing in the morning while it's still cool. This first coat is probably going to be about three times thicker than any previous coat.
-
Permalink Reply by Phillip Westendorf on
-
Guy,
Be careful of the temperature changes as you apply epoxy to the unfinished bottom. If the epoxy is applied to a porous substrate (plywood) which is cooler in the morning and the temperature rises significantly during the day it may cause the substrate (plywood) to "outgas" and form bubbles or pinholes in the epoxy coating.
This is something I avoided when I did my canoe's outside by waiting until 11:30 AM to begin the epoxy wetting out. Unfortunately this will cause you to be doing the third and fourth coats later in the evening or night ( I finished at 1:00 AM the next morning) .
Also it's almost imperative you have a second person mixing epoxy for you because of the quantity you'll be applying to the 22 Oz. cloth. As you apply the previous batch of epoxy it's beginning to kick and if you have to stop and mix a fresh mixture it'll be more difficult to blend it to the previous batch. The width of the boat is going to cause you to have to work across in sections.
It's best to start about 2 feet from one end and work from the chine to the centerline of the boat and work back to the closest end. This will anchor the cloth to the plywood. Return to the edge of the wetted cloth and continue to the opposite end. Then move to the other side of the boat and work from the same end you started at and work to the end you finished the first side. Hopefully this will allow you an efficient way to wet it out the cloth. The subsequent coats can be rolled from one end to the other, one side at a time. Here's a picture of the starting process.
http://i5.photobucket.com/albums/y179/pwstndrf/16%20Peterborough/th...
It's kinda a pain in the behind but you do need a method. This one came from a canoe builders book and it worked for me.
G'Luck
phil w.
-
-
Phil, Thanks for the advice. I took the afternoon off, came home, and started working. The garage is at 70°F. Things have gone pretty well. Early on I started getting nervous if the heavy cloth was going to wet-out well, but it did. You just have to take your time and keep going over the same spots, again and again, until the cloth is transparent. I am using the West 105 resin and 206 hardener. It doesn't seem to "kick" too aggressively once it's spread out. (But a cup full of it, or a foam roller soaked with it, is a whole different matter. Then it gets quite warm.) I was able to keep up by mixing the epoxy myself. I have a 600-g capacity digital balance, some plastic drink cups, and some stirring sticks. It goes pretty well. Guy
-
Permalink Reply by Stephen Markley on
-
Hey Guy...
Wow what a great thread and thanks for sharing your journey with us. I have been reading this all morning... My RL has been so busy, I have not had time to log in for quite a long time... So I am playing catch up with this thread. The things you did with the frame jigs is very interesting to me, plus all the things you are learning along the way is very helpful to us all.
I was wondering if you could sent me a copy of your spread sheet too... that seems like quite a useful tool. My addy is smarkley AT gmail DOT com --- thanks!
-
-
Stephen, My spreadsheet is not user friendly in its present condition. It's quite an iterative process to get the calculations to converge and the demensions on the "cut sheet" are not documented. At the time I offered up my spreadsheet, I was greatly underestimating the complexity of the task. I worked on that spreadsheet from December 2011 to March 2012 to make it work. At some point I plan to go back to its development and maybe turn it into something that can be understood and used by others. But it's just not there right now. Guy
-
-
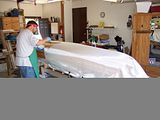
Here are some pictures of the initial wet-out of the bottom.
-
-
Here are some pictures taken after the wet-out and after many additional coats of epoxy. I will call this done for the night. Next I will let it dry for a few days and then give it a rough sanding and apply a few coats of epoxy with graphite powder in the mix.
As I posted earlier. To wet-out this thick 22-oz. fiberglass cloth, you have to be patient and keep working the epoxy over the surface of the cloth. And go back to those areas where the cloth is not transparent. I did start at the transom and work forward, working out the small air pockets on the way. As the epoxy starts to set up a little, it becomes easier to get rid of the air pockets, but you probably have a relatively short window of time. But it went pretty well once I realized that it was working.
© 2026 Created by Randy Dersham.
Powered by
![]()